Tuesday, January 25, 2011

1/25/2011 Sound Box Completed

Isn't it strange how sometimes you can work and work and have nothing to show for it. Fortunately there are other times when a lot happens in a short period of time.

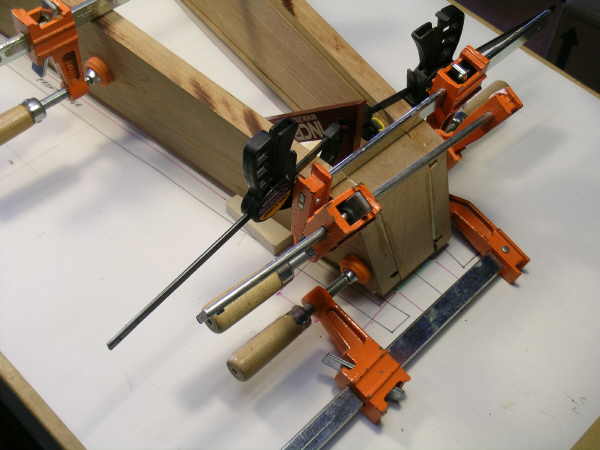
One of the tricky parts of this design is the pillar ending outside of the soundbox. For this to work the grain of the wood had to run front to back. However, construction for the Limerick says that it is important to have the direction running side to side. My solution is a laminate of wood added on the interior- going side to side. Think of it like a really thick plywood. Should be plenty strong. First I made the board by gluing a resawn piece of lumber, and then sanding it flat.

All the angles had to be matched in order to get a good fit. Then it had to be glued to the bottom in exactly the right place.

Sweet- this is just about as good as it could get. I'm proud.

I was looking forward to doing this little bit of turning. The dowel on which the neck rests is of ebony. I had some just the right size, so it just needed to be turned and finish sanded. I rounded the ends- carefully, using the big belt sander with a 60 grit belt- kinda like running it on a gravel road. Then I sanded it to 220 on the belt sander.

This may not look too good yet- but I know what I'm doing- or at least I hope so. No way to cut this out square, so I just cut each profile using a 1/8" Timberwolf blade on my 37 year old Craftsman band saw with each side flat to the table. Now I just need to even it out some.

Here are some of the tools- a very coarse rasp and a coarse, round micro-plane file. Between the two and a bit of sandpaper it came out great. Finessed the groove for the dowel by wrapping sandpaper around the dowel and using it to make it a super fit- gotta give hubby credit for that idea.

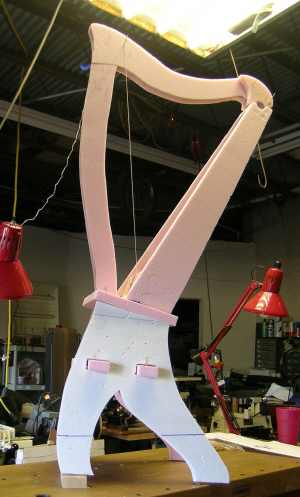
I haven't shown the soundboard and back board, but they are complete and ready to go in later on. Cutting and fitting took quite a while- but then I tapped on the boards while they were in place- and got a really great sound. A good omen for a great sounding harp- I hope.
Now I get to cut the neck and pillar out of 2" thick cherry boards.
Time: 13 hours Total: 73

Thursday, January 20, 2011

1/20/2011 S-L-O-W Going

Days and days of mostly just staring at the dumb thing wondering why- oh why- things did not meet the way they should. Take a little off here- then a little off there- shoot!- think I took some off the wrong side. This was not the way to go.

My micro-plane was going to be my salvation, but it may have created more problems than it fixed.

Talk about creative clamping! Trying to get all the angles right and everything where it is supposed to be so that the screws in the base will end up in the right places. Not so effective.

The base is screwed- (no comments from the peanut gallery)- but the sides are not in the correct alignment. Fiddled with it every day (day after day) for 2-4 hours and still didn't have it just right. Finally gave up and decided to work from the neck down. Maybe the top of the harp (knee block) will be able to keep everything aligned and I can drill yet another set of holes in the base- running out of room there now.

We won't even go into how many hours were spent taking the measurements for this paper pattern. It seemed to fit fairly well, so I made a cereal carton cardboard model to see if it was going to fit.


I glued up some scraps of cherry to make a big enough block for the knee-block, and then I cut it using the band saw. Not a good fit at all. Took it to the big belt sander to refine some of the angles. Finally used hand sanding on a flat surface to get it pretty close.

Went shopping for some new toys. Gotta be a better way to measure small angles on small areas. Finally got a digital angle gauge and angle-measure-thingy at Home Depot. They both work fairly well, and I like the digital readout, but there is no way to accurately measure an angle when the side is just 1/4" wide. Lesson learned- cut it right the first time- dummy!

Dry run to fine tune the details. Lining things up on the plans is a big help. It ain't perfect, but I think it just may be close enough.


Ready or not- it is glued. Tough job because of all the weird angles. It wanted to squish out when the glue was applied. Lots of clamps and lots of glue and I'll know tomorrow morning whether or not it will do.
After the screws are in the base correctly I can measure for and cut the soundboard and back board. Once they are cut I can work on them for adding the string reinforcement and decoration to the soundboard, and put the sound-holes in the back board. That should be easy. Nothing could be as hard as making and fitting and gluing that knee block and making the base.
Time- 8 days, 23 hours
Total= 60

Wednesday, January 12, 2011

1/12/2011 Lotsa Progress

Doesn't seem like 6 days have passed, but the calendar does not lie. I have a lot to catch up with.
First order of the day was to edge join the pieces I would need to have wider- like for parts of the stand legs and the base of the harp.

These Bessey clamps are the best.

Then I needed to cut the angled sides. This was the most dreaded job, and the first rip (with the grain) on the table saw (my second least-favorite power tool). Took most of a morning to assemble the tool and then to figure out what angle needed to be cut. Finally double-sided taped the wood to the jig so that it would not slip during the cut.

Obviously the angle was not perfect, causing the wood to go through the blade at a slightly off angle- hence the burning on the cut edges. No worries, it will be gone with sanding later on.
Then, the slots needed to be cut at 5 degrees, going the same direction on both edges, and the sides needed to be mirror images so that the soundboard and back would slide into them and be planar to the front and back sides. That took a lot of cogitation, but it came out OK, so it was worth the hours of set up.

I taped some 1/4" pieces of basswood to the backside of one of the edges to make the angled cut at 5 degrees on the opposite side. The blade only tilts one way. Last time I used the other side as a spacer- forgot about that this time. Should read my own blog! Would have been easier, and more accurate.

Making the ends rabbets were easy once I got the angles right. I should have dug out and used the $150 SysteMatic dado set, but being lazy I just made repeated cuts with my $110 Forrest WoodWorker 2 blade. I will clean it up with a carving gouge. The dado set would have made a cleaner cut, but it would have take me an hour to set it up.

Now I get to do the fun part- using the band saw- my very favorite power tool. First I essentially designed the harp base on the wood. I had run it through the planer again to make it perfectly smooth on both sides. Here I'm using drafting tools to make nice-looking curves. Then there is the hard part of determining at what angle to make the cuts. Remember that the back and front are at two different angles- and, the side to side angles are different too.

Not one to trust the gauges on the machines- you never should- I set up with this bevel angle gauge. Then, just as a double check (because it is easier to over-check then it is to fix a mistake) I also check empirically, with the side itself.Now you know why it can take me so long to set up.


After making all the cuts I could get at with the band saws I got to do some hand sawing with my Bakuma Japanese back-saw. Love those saws. My Dozuki is my favorite saw and I should have used it here because it has finer teeth and would have made a better cut. Musta been getting tired.


I'm satisfied with the fit, especially considering the complexity of the cuts. I will have to do something to smooth out the design elements, but that will be for later, when I see it all together.
Now I will dry- assemble the base with screws and work on designing and making the top piece.
Additional time= 16 hours over 4 days. Total= 37, so far.

Thursday, January 6, 2011

1/6/2011 Stand Mods

After getting some great helpful feedback from members of my Virtual Harp Circle (Yahoo! group) friends I decided that the harp needed to be shorter and angled more towards the player. That would make the strings more vertical and the player would not have to lift the arms as high to play. Here on the workbench I've propped up the front of the harp to simulate that change.
Then you see the result in place. I decided against removing too much of the legs of the stand. Not much difference, but hope it still balances well in wood. That is the plan for the Limerick soundboard stuck to the side. By using that string layout, and that for the neck, I hope to get the same sound.

With that settled I could disassemble the foam mock-up and start to pick out my wood. This may seem like an easy job, but I spent 6 hours yesterday working on the project- which brings me up to about 21 hours so far- and I haven't even started to make sawdust.

Here is the stack of foam and the stack of cherry wood.
This is the scary part- now I have to commit and start cutting up the wood. Without a set plan this will be interesting. I read recently that with a prototype you just make the first piece and then fit the next one to it. . . and so on. Easy for that guy to say, he wasn't making a harp!

Tuesday, January 4, 2011

1/4/2011 Model Completed


Here is a good example of just how difficult joinery is with foam. Lots of slop and instant gratification- not at all like wood. Wonder if one can play a foam harp- nah.

The foam model has been assembled for the first time- with toothpicks, tape, and chewing gum (just kidding about the gum). I tried to glue some parts with Titebond, but it never dried and didn't stick well. I've decided to return to the original plan to end the bottom of the pillar outside of the sound box. Hope it works. Everything else looks good to go.

I'm designing and making the base for the harp now. If I say I'll do it later I know it will never happen, so I will do all the building at the same time. I have changed the base profile many times and ended up with this 'walking man' design. I like it. By placing the pieces altogether I can make the base to fit just right (fingers crossed).

I ran out of pink foam so we have a two-toned harp base. I also left these pieces 1" thick though the wood version will use 3/4" cherry. You can see my Heartland DreamWeaver next to the model for size comparison. Everything has so far fit better than I anticipated. Then again, foam is much more forgiving than hard wood.
As you can see in the last photo- this is a perfect fit for me- and I am a happy camper.

Saturday, January 1, 2011

1/1/11 Pink Model

Started the new year off right with many hours in the shop working on the harp project. I'll try to keep track of my hours- a good guess would be about 10 hours to date.
I don't kid myself that working with this foam is anything like working with wood, but I need to get a prototype before I can even think about making working drawings.


I spent a lot of time trying to get my styrofoam pieces to stay in the right plane before I got the brain storm to make some supportive blocks at the right angles. Note the high-tech fasteners. At least they are easy to reposition, but they are not too stable.
I ended up drawing a lot on the table top- should have laid a big piece of paper down first- but that would not have been as stable. Time to refinish the top anyhow.
Finally got a piece to fit neatly into the top part. I won't show you the rejects- too discouraging. Suffice it to say that working with compound angles is difficult. The second layer isn't quite as pretty, but I have to shape it after I remove the model off the table, and I'm not there yet.


I have thought about how much easier it would be to make this harp with parallel sides- then I thought about megaphones and speakers and how they amplify sound- so I'm working the angles. On this base piece, for example, it has to follow the angles of the front and back (different angles, of course), as well as the angle of the bottom of the harp. . . and, fit fully into the bottom of the sides. That is another step that has to wait until I take the pink model off the table- tomorrow.